Creating a Dynamic 2D Journal in Unity
This is a tutorial for creating a 2D journal or book in Unity, with page flipping animations and dynamic text which can be changed at runtime (such as in the case with localization etc.) It is also compatible with interactive UI elements, and can be used as a Start Menu or Settings Menu. Note that for this tutorial, I will be using Text Mesh Pro for all of the text elements.
This is the journal I’ve been working on for Mr. Honeybunch. It’s still a work in-progress, but I’ve had some requests for more in-depth documentation regarding the page-turning animation (which I originally posted to my Tiktok account) and so here’s what I’ve got so far. At the moment the journal supports:
- Multiple animated pages with dynamic text
- Buttons and interactive elements
- Tabs to jump to specific pages
The Page Turn Animation
Creating the Sprites
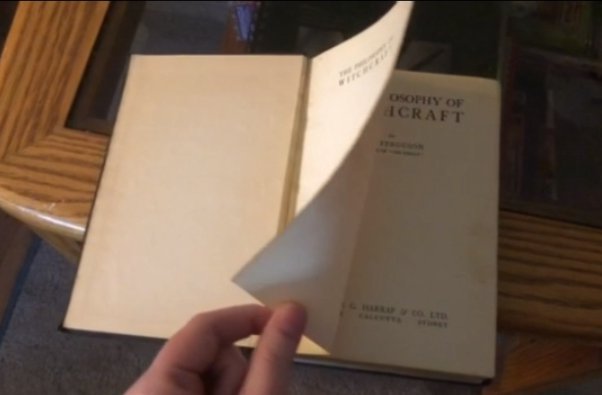
For this journal I’m using 2D Sprite animation (no tweening or deforms, just basic sprite swapping). The first thing I did was record some footage of a myself turning a page in an actual book, and then used this as a reference for drawing the page sprites. The actual amount of sprites you’ll want will depend on how smooth the animation in your game needs to be. Because I’m a fan of janky animations and getting things done quickly, I made 7 sprites. Also because these sprites are pretty large, it’s a good idea to follow best optimization practices (listed at the bottom of this post) in order to keep performance and disc space reasonable.
Animating the Pages
I animate the pages directly within Unity using the engine’s built-in Animator/Animation system, and each page will have its own Animator. I set all the tangents to Constant, which prevents tweening between the frames.
(Note that if you want to use this as a Pause Menu, you’ll want to set the Animator’s Update Mode to Unscaled Time, so it still animates if the time scale is 0.)
Adjusting the Sort Order
An important thing to keep in mind when animating overlapping 2D sprites is that we’re going to need to manage the sort order of the sprites somehow. When the page flips over from one side of the book to the other, it will switch from existing behind the previous page, to in front of it.
An easy way to manage this is to set up an Animation Event which swaps the sort order of the sprite during a specific part of the page-turning animation. If you’ve never used an Animation Event before, all you need to do is set up a script to handle what you need, and attach the script to the same object which the Animator component is attached to. We can then call this script from within the Animation by right-clicking in the area directly below the timestamp and selecting Add Animation Event.
public void IncreaseSortOrder()
    {
        journalSprite = journalPage.GetComponent<SpriteRenderer>();
        journalSprite.sortingOrder = sortingOrder2;
    }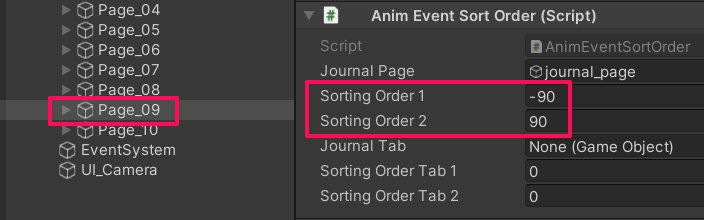
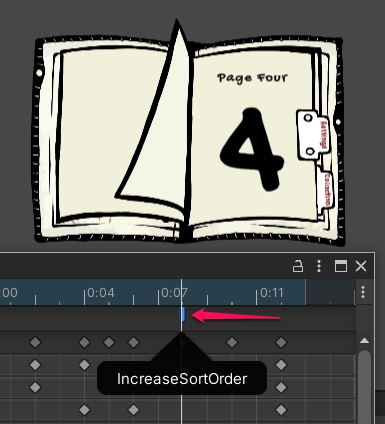
Note that you want your function to be a public void type. In the code above, we have a public int called sortingOrder1 (the default sort order) and another called sortingOrder2 (what the sort order should change to when flipping the page) and I assign these values to each page in my journal. The public GameObject called journalPage is the object which has the sprite renderer attached to it and is also assigned per page. To keep things simple, I’m just switching the order from a negative to a positive value. So page one uses -10 and 10 for its sort orders, page two uses -20 and 20, etc. Theoretically this could all be assigned via code based on the page number, but I don’t have too many pages and don’t mind setting up each one individually. However, if you have hundreds of pages then you may want to automate the process.
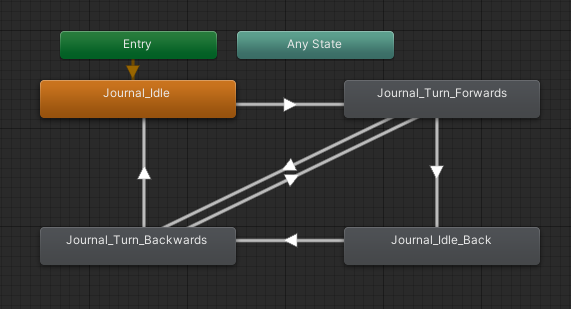
In total, I have four animations set up for the page turning. One for turning the page forwards (calls IncreaseSortOrder event), one for turning it backwards (calls DecreaseSortOrder event which sets the sort order back to default), and a basic idle state for whether the page is currently facing the front or the back.
Colliders, Canvases, and Sprite Masks
Setting Up Colliders
In order to interact with the pages, we’ll want to set up some 2D colliders for each page. I use a Box Collider 2D for the front side of the page, and a Circle Collider 2D for the backside. The reason for this is that it makes it easy to reference via code when there’s only one of each collider type attached to the object (as we will want to deactivate colliders when the page is not visible, but we will get to this a little later). When clicking on the corresponding collider, the page will either flip forwards or backwards depending on which way it is currently facing.
Setting Up The Canvas
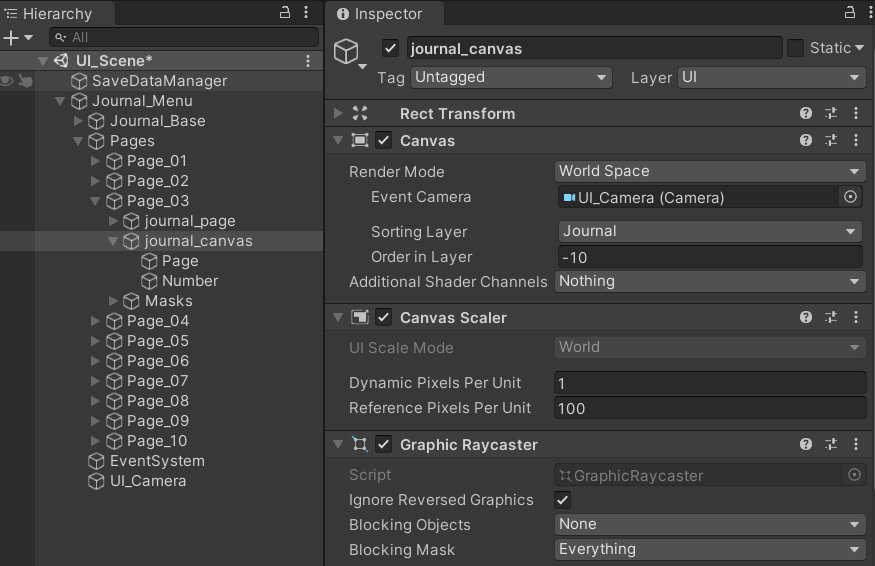
Next we’re going to need a canvas for our page. This canvas is going to be rotated when the page turns and will appear as if the text is written on the page. We want the Render Mode set to World Space, the UI Camera assigned, and the Sorting Layer should be the same as our journal sprites (though the specific Order in Layer doesn’t matter too much as we will be setting the sort orders for our text and images separately.)
All of our text, buttons, and images will be set as children of this canvas (but buttons will also need their own additional canvases).

Setting Up The Sprite Mask
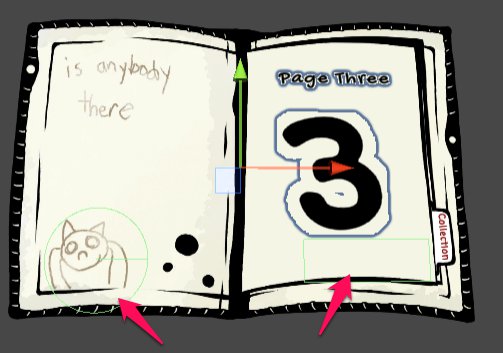
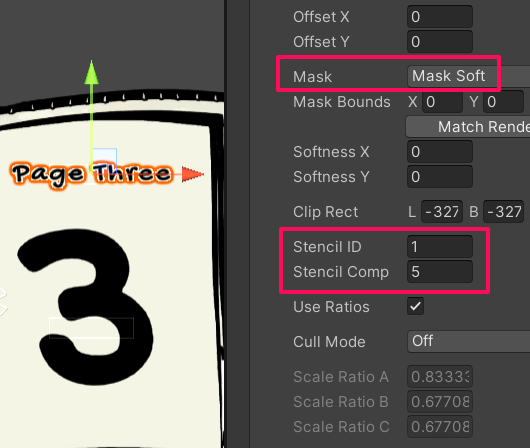
I created a sprite mask for each frame in which the text and images on the canvas need to be hidden, and then I enable/disable the masks as part of the page turning animation. Since we only want to block out the text on the specific page which we are animating, we’ll set a Custom Range on our Sprite Mask for each page. In the pic above, we’re setting up Page 3 whose sorting order is set to -30. The text and images on this page will be set to -25, so we’ll set our custom range to affect sprites between -26 and -24.
Note that in the example above, the sprite mask covers up the area of Page 4 but it is being applied to Page 3. We only want the text on Page 3 to be visible Outside the Sprite Mask, and you can see that the text on Page 3 is not visible within the masked area.
Masking Text and Sprites
To set up the text to be maskable, click your text object and navigate to the Material Settings for your font as shown in the Inspector. Scroll down to Debug Settings and set the Mask value to Mask Soft, Stencil ID to 1, and Stencil Comp to 5. This will set up your text to appear outside of the sprite mask. (Note you will have to reverse/tweak the settings if you would like your text to appear inside the sprite mask). This does update your font material, so make sure to create a separate copy if you don’t want these settings to affect all of your text globally.
To set the sort order of your text, navigate to the TextMeshPro – Text component in the Inspector and click on Extra Settings at the bottom. Here you can set the sorting order and layer as you would a sprite.
For any sprites on your canvas, simply set the sprite’s Mask Interaction to Visible Outside Mask and ensure the Order in Layer matches the sprite mask you set up earlier.

Animating the Canvas
We’ll animate the canvas within the same animation as our page sprites. Again, we’ll want to set our tangents to Constant in order to remove tweening between frames. If we set up the pivot point on our canvas to the left-hand side (so it matches the middle of the page) then we just need to rotate the canvas to match the turning pages so that it appears to be on the page in each frame. This will look janky in 3D mode but presumably this is for a 2D game and so it shouldn’t matter. When the page flips over completely, we can set the canvas as inactive.
Setting Up Buttons
There is a small problem when using Unity’s standard button system, which is that the button elements don’t mask or sort properly with our journal, and we end up with the issue we see here in that the button elements are not being masked during the animation, and the buttons on the second page are appearing in front of the first page. One solution would be to create your own buttons instead of using Unity’s standard buttons, but I want to use the Event System here and so I’m just going to use a quick workaround.

For the standard buttons, we’re simply going to set the default transparency to 0 and only have the buttons update on Hover and Click so they will never be visible when the page is turning. To prevent the button from entering a Selected state, we can add an event OnClick which will immediately deselect the button the moment it’s clicked on.
public void DeselectButton()
    {
        eventSystem.SetSelectedGameObject(null);
    }
For other elements, such as the arrows on the audio sliders which need to be visible at all times, we’re simply going to set the button’s transparency to 0 and then add a sprite object as a child of the button. We’ll make some code to mimic the hover and click states which the button uses, but apply them to the sprite instead. We can then call this code using the Event System when the (now invisible) button is clicked or hovered over.
public void OnMouseOver()
    {
        buttonSprite.color = hoverColor;
        isHover = true;
    }

public void OnMouseDown()
    {
        StartCoroutine(OnClick());
    }

public void OnMouseExit()
    {
        buttonSprite.color = defaultColor;
        isHover = false;
    }

IEnumerator OnClick()
    {
        buttonSprite.color = clickColor;
        yield return new WaitForSeconds(0.1f);

        if (isHover)
        buttonSprite.color = hoverColor;

        else
            buttonSprite.color = defaultColor;
    }
Note this also seemed to work fine for the handle sprite on the slider element, but I’m not using the fill component which is part of the standard slider UI and so I’m not sure how to get that working. Is there a more elegant solution to this problem? Probably, but this is what I did.
Additional Tips
Because it’s possible that a button may overlap with the page’s colliders, you could end up clicking both at the same time and turning the page when you do not intend to. As such, it’s a good idea to do the following:
- set up a button event to disable the current page’s colliders when hovering over the button
- re-enable colliders on mouse exit
- add each button on the same page to an array so they can all be disabled via code if needed
The Master Journal Controller
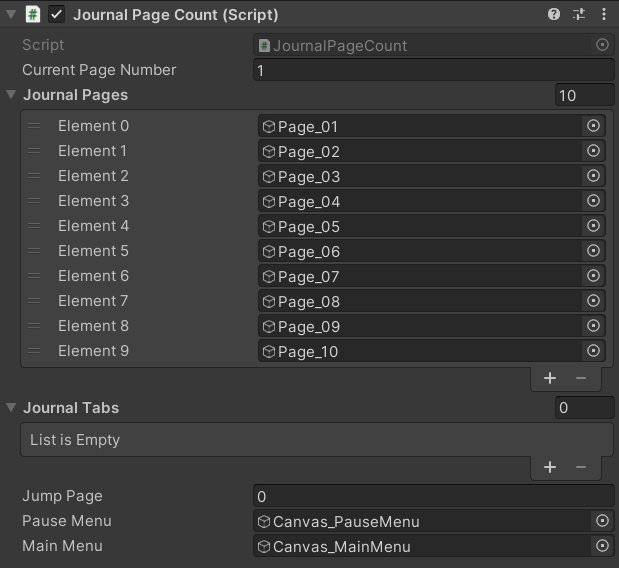
Just as each page in the journal should keep track of the specific elements on its page (colliders, buttons, canvas), it’s also a good idea to create a Master Controller for the journal which keeps track of which pages exist, what the current page number is, any tabs or bookmarks which exist, etc. This is helpful for controlling which elements are active, allowing players to jump to a specific page, and so on. I won’t go too much into the code as it depends somewhat what you want to do with your journal, but I’ll provide some examples.
Updating Page Information
The most important job of the master controller (which I refer to as the Journal Base) is to update the relevant information of each page each time the page turns. For me, this is what I want to do:
- update the current page number
- disable the colliders for all pages except for the current page and the previous page
- disable animators for all pages except for the current page
- update the animation states of turning pages
- if jumping to a specific page, animate/update all pages between the current page and jump page
- disable buttons when pages are animating (this is done via Animation Event)
For example, here’s the code which is attached to the Journal Page object:
//animate the page on mouse click depending on whether it should turn forwards or backwards
    void OnMouseDown()
    {

        if (isForwards && !isDisabled)
        {
            this.GetComponent<Animator>().enabled = true;
            AnimPageForwards();
            journalBase.GetComponent<JournalPageCount>().currentPageNumber = (pageNumber + 1);
            Debug.Log("Current page number is " + journalBase.GetComponent<JournalPageCount>().currentPageNumber);
            journalBase.GetComponent<JournalPageCount>().UpdatePages();
            return;
        }


        if (!isForwards && !isDisabled)
        {
            this.GetComponent<Animator>().enabled = true;
            AnimPageBackwards();
            journalBase.GetComponent<JournalPageCount>().currentPageNumber = (pageNumber);
            Debug.Log("Current page number is " + journalBase.GetComponent<JournalPageCount>().currentPageNumber);
            journalBase.GetComponent<JournalPageCount>().UpdatePages();
            return;
        }

    }

    // ensure that only the active page (front and back) are clickable
    public void UpdatePageColliders()
    {
        currentPageNumber = journalBase.GetComponent<JournalPageCount>().currentPageNumber;

        if (pageNumber == currentPageNumber)
        {
            this.GetComponent<BoxCollider2D>().enabled = true;
            this.GetComponent<CircleCollider2D>().enabled = false;
            journalCanvas.SetActive(true);
            Debug.Log("Enabling canvas for page number " + pageNumber);
            this.GetComponent<Animator>().enabled = true;
        }

        else if (pageNumber == (currentPageNumber - 1))
        {
            this.GetComponent<BoxCollider2D>().enabled = false;
            this.GetComponent<CircleCollider2D>().enabled = true;
        }

        else
        {
            this.GetComponent<BoxCollider2D>().enabled = false;
            this.GetComponent<CircleCollider2D>().enabled = false;
        }

        if (pageNumber >= (currentPageNumber + 5) && (journalCanvas != null))
        {
            journalCanvas.SetActive(false);
            Debug.Log("Deactiving canvas for page number " + pageNumber);
        }

    }

    public void ShouldDisableAnimator()
        {
        currentPageNumber = journalBase.GetComponent<JournalPageCount>().currentPageNumber;

        if (pageNumber == currentPageNumber)
            this.GetComponent<Animator>().enabled = true;
        else
            this.GetComponent<Animator>().enabled = false;
    }

    //update animation state of pages when turning
    public void AnimPageForwards()
    {
        thisAnim.SetBool("turnForwards", true);
        thisAnim.SetBool("turnBackwards", false);
        isForwards = false;
    }

    public void AnimPageBackwards()
    {
        thisAnim.SetBool("turnForwards", false);
        thisAnim.SetBool("turnBackwards", true);
        isForwards = true;
    }

    public void DisableButtons()
    {
        if (pageButtons != null)
        {
            foreach (GameObject button in pageButtons)
            {
                button.GetComponent<Button>().interactable = false;
            }
        }
    }
Note that the function UpdatePageColliders() does not get called from this script. Instead, we want to call UpdatePages() on the Journal Base script, which will then loop through and call UpdatePageColliders() on each page in the journal (and not just the specific page which is turning).
public void UpdatePages()
    {
        foreach (GameObject page in journalPages)
        {
            page.GetComponent<JournalPageScript>().UpdatePageColliders();
        }
    }
Tabs and Bookmarks
It’s likely that you’ll want to allow players to jump to a specific page in your book/journal (do not be alarmed, the teapots are just my placeholder buttons). I’m using tabs for my journal, but you may want bookmarks, a table of contents, etc. What I did was create a JumpToPage() function which will animate all the pages between the current page and the page which I am jumping to.
  public void JumpToPage()
    {
        currentPageNumber = jumpPage;

        foreach (GameObject page in journalPages)
        {

            if (page.GetComponent<JournalPageScript>().pageNumber < jumpPage)
            {
                page.GetComponent<Animator>().enabled = true;
                page.GetComponent<JournalPageScript>().AnimPageForwards();
            }

            if (page.GetComponent<JournalPageScript>().pageNumber >= jumpPage)
            {
                page.GetComponent<Animator>().enabled = true;
                page.GetComponent<JournalPageScript>().AnimPageBackwards();
            }
        }

        UpdatePages();
    }
This may not be a good idea if you have a significant amount of pages, as that would be a lot of Animators going off at the same time. In such a case, you may need a better performing solution, such as disabling the pages in between, setting them to a specific state in code, etc. However, I only have 10 pages, so this is what I did.
Optimization Tips
Because we have multiple large sprites on the screen at once, and multiple pages animating simultaneously, here are a few things to keep in mind to improve performance:
- Always make sure both the height and width of your sprites are divisible by 4
- Make sure your sprites are set to Crunch Compression
- Make sure your sprites are added to the same Sprite Atlas
- Disable pages and/or canvases which are X pages away from the current page
- Disable animators for all pages except the current page (can re-enable on click)
- Check the Statistics tab in Unity to ensure that page elements are batching correctly
Final Thoughts
So that’s the basics of how I’ve set up the 2D Journal for Mr. Honeybunch so far! Hopefully this was helpful, and if you end up making something similar definitely let me know so I can check it out!
Happy game devving!
~ Mr Honeybunch